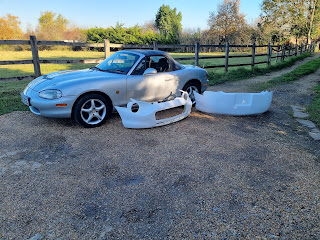
My Build Experience Of The retrocarstyle.com Kit
Hoping this helps anyone contemplating the new body conversion by retrocarstyle.com for the nb/nbfl MX5. Its a really simple build and this post documents 6 hours work to get it to this point.
I got the kit and picked up a very low mileage NB as the base. The designers original concept was for a 50s style roadster but I decided I'd like a retromod version, bigger wheels, lower stance, modern lighting etc.
I managed to pick up some MX5 Enkei 16" alloys and had them refurbed.
An idea of mine reference the rear lights...
Original thought was I could graft them into the rear bumper but that's on hold for now.
I keyed the inside of the bumpers....
and coated them liberally with Gravitex for protection
I then keyed and clean the front bumper and primed it with plastic primer
So on to stripping the front down. The oem bumber comes off with one screw attached to each front wing, you need to remove the inner wheel arch liners to get access to these. The other fixing bolts are pretty obvious on the slam panel in the engine bay. Be aware there are a couple in the original intake recess. Then undo the lower rad ducting tray and away it comes.
With the impact bar you have choices, take it off all together and bin it or trim it down to fit behind. That will depend on your grill choice. Ive been using Hydrate 80 and Gravitex for any newly exposed metal, cleaning off any rust as I go
In order to make space for the bumpers headlight 'bowls' you need to cut out some of the sheetmetal for the oem healight support. Its non structural so no worries there. All very obvious as you tentatively try the bumper for size.
Note the earth plug below, one each side that you have to reposition.
Then it was time to offer the bumper up
I only had to trim one tiny tab off the outermost upper left mounting point. Apart from that it went straight on. So I then marked up for drilling the mounting holes where the bumper fits to the slam panel. The kit does have mould markings which make that easier. I would recommend drilling them 1 or 2 mil bigger than the bolts, this allows jiggle room and more importantly puts less stress on the grp. I will be placing rubber washers between the bumper mounts and the oem metalwork.
Then for fitting the lights. Any standard 7 inch Wipac type bowl will fit, I did need to have a light go around the edges with a drill and bobbin sander to get the headlight bowls to fit perfectly.
Then you just have to drill the holes that mount the bowl and allow the headlamp adjusters to be recessed.
My idea for the grill is different to the concept idea of Morris Minor and I bought some modern mesh ABS on ebay. To mount this I bought 5 Big Head Thread Studs from carbuilder.com
I cleaned off the gravitex and glassed all 5 of them in place
Another point on the lights is that the chrome rings need fixing with a screw at the bottom, Easy on a classic Mini or Minor but not so here. My solution was to drill a hole. It will also provide a drain and stop horrible puddles/stains on the bumper. Once the lights and rings are fitted it wont be seen.
Grill cut and test fitted
Then onto a bit of prep before it goes off to be painted in a few days.
Below you can see a bit of filler work, reason for that is only because there are recesses for the Morris Minor Grill surround. Im 50-50 on whether Ill fit that so filled them with a light skim.
So thats it really. Ill write another post soon on light wiring and my idea for fixing the bottom of the bumper and rad ducting! Easy peasy so far, hats off to Alan at retrocarstyle.com


Comments
Post a Comment